Friday, July 10, 2015

Voxel Engines, Lighting, Shadows, and Occlusion

SteamShards early alpha: Directional light, no shadows
Game-engine lighting is a complex subject. If you're a graphics programmer, though, it's ... standard fare. It's what you do. Lighting, shadows, occlusion, and effects dominate the job.

But voxel worlds -- especially sandbox voxel worlds, where any block anywhere can be added or removed at nearly any time by any player -- are entirely different than normal graphics programming. That's a lot of any. The rub is that the precalculated lighting techniques common for fixed level designs don't work too well when you've got tens of thousands of voxels on the screen. How much can you reliably recalculate whenever something changes? It's worse in a multiplayer world, too, where it's not just the player but any player out there changing stuff. And procedural terrain generation means you can't have an artist go in and place lights and sampling probes by hand.

This is the problem. How can you do effective lighting under such conditions? All geometry is effectively dynamic, and there's tons of it. All lights are effectively dynamic, and if you've seen Minecraft castles lit for night, you know there's tons of torches everywhere. Now you need code to handle what's normally beautified by an experienced, talented artist.

With and without directional lighting
So let's start with technique #1: directional lighting. This adds a huge amount of reality to a voxel world. The first screenshot has only directional lighting; the second screenshot (here on the left) compares a scene with it and without it. The effect is even more useful when you're playing the game, as you quickly get used to where the light is and what different shades mean in terms of how the world is shaped. Directional lighting is so profoundly helpful that it's difficult to find screenshots that don't have it, or a more complex variant.

Technique #2 is shadows. There's many different shadow techniques, and most of them are great when you have a few lights in the scene, or a few major lights. In outdoor worlds, sunlight is one of those. It's very common to see shadow maps used even in games where a lot of the geometry doesn't even cast shadows. You know World of Warcraft? Big game, right? Tons of great art and some fancy lighting effects -- but things like tables and chairs cast no shadows. Yet the players do, and obviously that's enough for them.
Early Minecraft Lighting: Directional light + shadows

The third screenshot (here on the right) is a very early build of Minecraft, which uses a simple lighting model that just has a directional light (the sun) plus voxel-based shadows. Those shadows give a lot more life to the game, compared to the first image at the top of the page.

There are some other texture tricks that one can add: bump maps, specularity maps, emissive textures, or extreme tricky stuff like ambient occlusion, depth-of-field, "god rays," bloom, and so on. I'm gonna skip most of these and stick to one, because of its relevance to voxel worlds: occlusion.

Voxel Occlusion in SteamShards
Advanced lighting models try to model "radiance." In effect, what it models is the fact that real light bounces off of surfaces and lights everything else. Surfaces aren't lit just by direct light, but also by all of that indirect light.

On a bright day here in real life, interior rooms still appear well-lit not because of direct sunlight but because what incoming sunlight there is (even none!) bounces around everywhere. Just having a window open to the sky can provide enough indirect light to effectively illuminate an entire room -- and even the next room over.

Occlusion is somewhat the reverse of radiance: it models where light isn't bouncing from. Corners are darker than the middle of walls because the adjacent walls (and floor or ceiling) block light that might otherwise come in. This final screenshot is another old screenshot from SteamShards, one with an early implementation of a shadowing algorithm. There's no directional lighting here -- everything is just shadows and occlusion. Each vertex looks at the four voxels in front of it. The more of them that are filled, the darker the vertex.

There's troubles once one adds in subvoxel shapes, however, and that's one of the issues that I'm currently addressing. The technique I'm using is Pretty Dang Messy™, but I'll write it up here when I'm happy with it!

Tuesday, July 7, 2015

Generating Decorative Terrain Features

Rock outcrops in various sizes, shapes, and rock types
I'm working in a little test world -- featureless, nearly-flat terrain -- to add bits of interest to the terrain generators. Not sure what got me on this kick but I started working on it over the weekend and I've added a few so far. The first that I added was rock outcrops, and so that's what I'm calling stuff like this: Outcrops.

I'm currently working on adding a type of rock "outcrop" that's actually very low to the ground, sorta kinda like replacing a small patch of terrain with rock, but also adding a little bit of height to the thing.

I'm thinking of where I go next with the terrain generators, and really the process got me thinking about how I want the world to look. What I want to strive for. For one, I really need to put the mountains and forests back! But after adding a few more outcrops, that's what I'm planning on doing; getting the whole thing going again. Generating screenshots of whole worlds again, rather than this little test area.

It's starting to feel empty without a skybox, actually. That's probably the first thing back.

Sunday, July 5, 2015

Obi-Wan Errors and the Subvoxel Blues

I just discovered another glitch in my voxelizing algorithm. In some cases, I was seeing holes in geometry, like specific bits of a voxel weren't being rendered.

This is ultimately because I very aggressively strip out voxel sides that can't be seen. If a voxel is blocked on one side by another voxel, then there's no reason to render that face.

First note that I cut the world up into 16x16x16 chunks in order to submit reasonable amounts of geometry to the rendering engine; allowing me to clip what's not in front of the camera, and meaning that I don't have to do too much work whenever the user edits terrain -- by mining into the ground, placing fortifications, or just using the tools to do some terraforming.

OK. Now. Take the naïve case: in a 16x16x16 chunk, and assuming it's solid, that's 4096 different little cubes. Each one has six faces, and each face (quad) is actually rendered using two triangles. That's just under 50,000 triangles in one chunk. Hmm, ok, not a big deal yet. Next, remember the view distance is 8 or 10 or 12 or 16 or 20 chunks' distance. In all directions. If you're staring at the ground, this means 512 to 8000 chunks. It's easy to say "I want to see further" but that means an exponential increase in the number of chunks that get drawn. So 50k tris times 8000 chunks is 400 million triangles. Per frame. That's a lot.

Now compare that to a flat surface, where everything hidden is not drawn. Then you only see the surface chunk -- if your view distance is 20 chunks, that means 400 chunks, not 8000. And there's only one side of each visible voxel drawn, so two tris per voxel. And in each chunk you're only seeing one layer of voxels, not 16 layers. So that's 256 voxels per chunk. 256 voxels x 2 tris x 400 chunks = 200,000 tris. That's a thousand-fold reduction in the amount of work to do. When you're working with voxels, it pays to save as much work as possible.

Back to the problem: I noticed this problem while working on a new terrain gen feature. In some cases (but not all), what should have been visible wasn't being rendered. I played around with reproducing the problem and I got the image above. I realized that the problem is yet-another "16 problem," of which I've had a few. Lots of special case stuff goes on at the borders between chunks, because I'm dealing with multiple chunks instead of just one.

The problem is dealing with the end of the fence differently than the middle of the fence. Normally fencepost errors are typing while (x<16) instead of while (x<=16), stuff like that. "Fencepost" gives the problem a natural analogy. They're sometimes called an off-by-one error, by which we get the name "Obi-Wan Error."

The second image demonstrates the fix. The sand marks the corner where four chunks come together, and you can see the brown clay material is now behaving properly.

I've got a bunch of bits that say "if the camera is inside THIS type of voxel, can you see THAT face?", plus routines to handle what happens when the voxel in question is rotated and if it's one of the 39 different non-cube voxel shapes that I support. In this case, I'm working with seven voxels. As I decide which face of a voxel to add to the geometry call, I consider its six neighbors. Originally, I forgot to swizzle the bits correctly; I previously fixed it for the "interior" of the fence, but not the borders. Now, with today's fix, I've got the end of the fence (the borders between chunks) working correctly.

Plus now I see that there's another lighting issue. Chunks appear to be importing incorrect lighting information at their corners -- but only one of the corners. The sides are fine, three of four corners are fine, but somehow this one is different. Hence: subvoxel blues. I've got more debugging on my plate tomorrow.

Saturday, June 20, 2015

Subvoxel Terrain

Range of subvoxels I currently have implemented
In my first pass at subvoxel terrain, I'm trying to shoehorn a random Perlin Noise field into a bunch of subvoxels. Instead of a single integer height value, I could use of the subvoxels pictured at right.

For now I'm sticking to just eleven possibilities: the solid voxel (duh), the half-slab, and the nine sloped options at the bottom-left of the picture. In other words, I can now support elevations at the corners -- that is, four elevation values go into deciding what to draw at each voxel.

There's some tricks here. What if the highest elevation is in a different voxel? Before I get into that, let me describe how I'm thinking about the problem.

First I pick a lowest integer voxel value; one that's at or below the lowest corner. This value I call "0", duh. Then the corners are numbered according to how many half-voxels they are above that voxel. The lowest corner could actually be a 1, or even a 2 -- the latter case if the lowest corner is 0.75 units above the floor.

The set of options I have to work with are things like 0011 or 0222 or 2202, etc. There's three ways to consider the numbers: as they are, with the northwest corner first; rotated, such that the lowest corner is first; or as a generic set of corner values. There's 15 possibilities in that set, btw, which I'll leave as an exercise for the reader.

15 possibilities -- if each corner is 0, 1, or 2. But what if I have a voxel where my corner values want to be 0, 1, 2, and 3? Or 1, 3, 5, and 9? That I'm just punting for now, actually. I've got some shapes that I could rotate such that I could handle a combination (clockwise) like 0044, and I'm planning on adding a couple shapes that would handle 0033 or 1144 or 1133. Maybe I need to add something for 1333? And I could do a two-voxel stack that would handle 0242.

I think options like 0244 is just right out; that would require a radically different way of handling voxels. Converting corner elevations to subvoxels is a bit of a "hack" -- taking what I have in the engine, and trying to find a simple way to generate undulating terrain with something other than plain stairsteps.

OK, so what DO we have? Let's take 0000, 1111, and 2222 first. In this cases, I have no voxel, a half-slab, and a solid voxel. Simple enough.

Next comes combinations of two height-values. The nine angled shapes in the front-left of the image represent the (clockwise) combinations 2211, 1211, 2221; 1100, 0100, 1110; and 2220, 0200, plus 2200. Note that I haven't implemented 2121, 1010, or 2020. With rotation, these shapes can handle all of the possibilities of two numbers (again, minus the 2121 1010 and 2020 cases).

There's also the problem of voxels like 1133. What do I do with that? If I'm not going to do two voxels (and I don't have the shapes for that yet), do I force that to 1122, or 2233 (and raise the surface voxel up one unit)? For now, I've got some simple logic that decides; I don't know that there's a one-size solution, so I went with "close enough" and we'll see where that gets me.

subvoxel terrain test world
So that's what I do. Simple pattern-matching. Here's what it looks like now, and it makes plain -- I need to fix subvoxel lighting! Guess what I work on next? :)

Saturday, June 6, 2015

Voxel-Based Lighting

Smooth voxel-based lighting
So, like, how do you light a voxel world, anyway?

I'm using Unity. However, my terrain is procedurally generated at run time. The data can be saved and loaded, but it's not like I'm building a Quake level here. My Unity scene is empty. Stark. Bare. I can't use all those fancy Unity tools for lighting. No lightmaps, no light samples, no baked radiosity, nothing.

And it's a sandbox voxel world. Voxels come and go, so I can't do anything fancy that requires precomputation. Whenever some user walks up and deletes a voxel, I've got to redo lighting. And if you've played Minecraft much, you know that you've got to kinda dump torches every 10 meters. All over the place. A distant view of your castle will have hundreds of light sources.

From playing the game, one can guess what Minecraft does. You might be wrong. At some point, lighting for a voxel was calculated by shooting out rays from each voxel into the sky, and the number of those rays that made it determined the light value for that voxel. This only works outdoors, though; what happens when the sun sets? What do torches do?

So the next guess has two parts: (1) Anything directly exposed to sunlight gets lit at full brightness (during the day). (2) Everything else seems to be lit by light values in a voxel slowly dropping from voxel to voxel. A voxel "in the shade" (ie not directly exposed to sunlight) but that is next to such a voxel will be lit just one tick darker. And so that's what I did.

The next trick is to figure out how to light each quad in the world. (With all my subvoxels, I've actually got to worry about WAY more planes, but that's a different story. Let's pretend we're doing strict cube-only worlds for now.) Lighting is there to see stuff, obviously, but we've got two main goals with the light algorithm: to model light occlusion, and to model light radiance.

The first means that something not facing a light source should be darker than something facing it. Further, if a quad faces a light source but is occluded by an intervening object, then it should be darker. In a simple game engine, we could model the sun using a shadow map, perhaps rendered in screenspace, to indicate which parts of the world are exposed to a light. But, again: 100+ lights! This is madness. We need a solution.

The second term -- radiance -- means that, even if a quad isn't exposed to the sun, it will pick up light bounced off of other surfaces. Ideally, the surface should colorize the reflected light. This gets tricky with sunlight, however, since the sun itself isn't in the direction of sunlight. Sunlight comes from the whole sky, bouncing through the atmosphere, although most brightly in a straight line. That bounced light is what makes outdoor shadows soft-edged and light. We kinda want an HDR solution here; a way of providing tons of resolution to the "how much light is here?" equation, as well as handling the fact that the human eye will adapt to the total amount of light in the environment.

But I get ahead of myself here.

So let's go back to the "simple" MineCraft-style solution. Any voxel directly exposed to sunlight gets the maximum light value. Any voxel with a torch in it gets the maximum light value. Other light-generating objects (jack'o'lanterns, ovens, glowstone) get the same treatment, although their light values are lower. Next, every other voxel gets assigned a light value that is one less than the most brightly-lit neighbor.

I'd love to colorize this light value. I'd love to directionalize it, so that we're actually modelling radiance; that would mean assigning 6 light values to a given voxel, with each value being not just a 4-bit value but an actual color. Maybe a full 32 bits. And maybe rather than the 6 cardinal directions, we could model 18 directions (the 6 + the 12 diagonal directions along plane lines) or 26 directions (ie to all neighboring 26 voxels in a 3x3x3 cube around our source). Do we have processor power for that? Hurm. Dunno. There are real-time lighting solutions for complex-geometry games that compute light in six directions, eg using a clipmap, that can model complex interactions.

But... well do we really need that much detail?

Ok, so let's go back. Let's just get something working. We got a light value at a voxel. How do we light quads?

The goal here, really, is to provide consistency. Take a 2x2 chunk of grass voxels, sitting in a plane under the sun. The intersection at the middle of the four top quads of these voxels should be seamless. Or not; that's a choice here. Minecraft Classic only lit quads by whether they were facing the sun or not. It was a simple directional one-light system with an ambient factor. You could tell which way a poly was facing by the lighting on its quads. At some point, MC introduced smooth lighting, and that's what I'm talking about here. Smooth lighting looks sooo much better. So that's our goal. (When did MC add good support for both sunlight and moonlight, and torches, and the rest? I don't know. I'm not too interested in the history here.)

So the solution I've used is to come up with a clear definition for the lighting at any given vertex based upon neighboring voxel light values and the facing of the tri. (Remember, I'm dealing with subvoxels that have many faces not in any of the 3 axis planes.) In the simple case, at a corner such as our 2x2 chunk of grass voxels, lighting at the corner is the average of the light value of the four voxels directly above the grass. No matter which voxel you look at, that voxel's quad will have the same light value at each corner.

This gives us partial occlusion for free. If one of the four voxels above a vertex is solid, then that vertex will only be 75% lit. Two voxels, 50% lit. Three voxels, 75% lit. And we let the graphics card smoothly interpolate lighting across the quad.

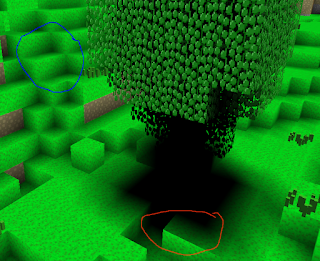
Take a look at the image. The red area seems odd; why the bright contrast? Well that's cuz the bright bit faces out into the sunlight, while the dark bits are directly under the tree. (Sidewise light propagation is turned off in this image.) Inside the blue circle, you can see that corners get progressively darker.

There's algorithmic hoops to jump through to get this working fast, but do you really want to know about hashsets? I'll skip those details for now.

Friday, June 5, 2015

Top 3 Keys to a Successful Kickstarter

SteamShards, the (current) name of the project to which all this terrain generation is going into, will be up soon on Kickstarter. Here's a preview to it.

I haven't posted much here lately because ... well I've been busy on lighting, and then writing all the code to handle the various subvoxel shapes (863 at last count) and proper lighting for them. I think I'm going to write a post on voxel lighting, actually.

There's tons of information out there on Kickstarter. I haven't launched yet, but I've got some comments on the campaign-creation process:

Video is top, I think. From everything else I can tell, having a video has the single biggest effect on sales.

It's weird to calculate that, though. I think the greatest multiplier might be being able to spell, and/or not looking like a tool. So, like, #0 is not looking like a fail project. I've seen kickstarters that basically said "I want to eventually be good enough to be a game dev," kind of a "fund my life" sort of goal with no reward. Those failed. Many failed projects were "I'm going to remake this obscure game from the 90s, and I need $100,000 to do it, and btw I'm still in high school." All sorts of things wrong with that: the tiny market, the outsized goal, usually bad grammar and art, but mostly very little evidence to suggest that the creator would be able to finish the project.

So #1, really, is "don't suck." Avoid bad mistakes. Have a video, include screenshots, have a key reward that people actually want. Spellcheck. And, if English isn't your native language but you're trying to sell to an English-speaking market, try to get a native speaker to review your page. If English is your native language but you're currently in 9th grade and failing at spelling... then you're not ready for Kickstarter yet. Hmm. I don't just want to complain though. If you are currently 23 and you have a great idea but suck really bad at spelling and grammar... then find a friend or partner to help. Put an ad in Craigslist for a copy-editor for $100. Ask a mate, spouse, girlfriend, mentor, whatever.

#2 is "be believable". You've got to convince people that you can finish the project and deliver the rewards. $25 or $40, sure, I could buy that project. But if I don't think the rewards will come, then I've got to weight that $40 against the chance I actually get the reward. If the project doesn't meet its funding goal, then OK, no cash lost. I'm fine with that. There's two parts to being believable: first, actually BE capable of finishing the project, and second, communicating that to people. Many of the failed projects I've looked at (and I've scrutinized a couple hundred projects) fail because the creator doesn't look like they know what they're doing. High school kids that want to make the "biggest" zombie game ever, someone that wants to make an awesome RPG (one of the most technically different game genres out there) but is currently only an artist, a team of one that wants to build the next MMORPG, stuff like that. It's possible for one person to make a game by themselves, but that usually means simple art, simple design, and/or simple tech. Middleware like Unity makes building a game much easier, but it doesn't provide any game design.

I've seen those projects, though. Unity is great! Someone buys a bunch of assets and scripts from the Unity Asset Store, throws them together, makes a build, and somehow gets the project onto Steam. It's buggy as hell and doesn't do much, but the assets look great. Those devs lived off of backers for a couple years, but now their reputation is ruined and they've got to switch to driving a taxi or working at dad's dry cleaners. Meanwhile the backers have gotten more sophisticated, more cynical; they'll look more closely at who they're willing to back.

To me, that means the gold rush is over. You'll no longer find placer deposits.

#3 is having a hook. That obscure game from the 90s is not a hook. "It's like Game X, but it has Feature Y!" That's your hook. Some hooks are more compelling than others. "That obscure game from the 90s, but MODERNIZED!" Well, um, ok, what does that mean? I don't even know what game your talking about. That's not a hook. "That popular game from the 80s, but MODERNIZED!" Well hey, here's a hook: that popular game from the 80s.

I think for SteamShards (that's my project, btw), I've got two hooks: steampunk, and subvoxels. Minecraft has procedural terrain, voxels, exploration, adventure, "world gates" (kinda; although there's only 3 worlds). I've also got Minions, Cities, and Invasions, though, but they're not really my hook. I'd like to think that the City complex -- cities, bad guys invading your cities, you having to defend your cities, and minions to help you do that -- are a good hook, but ... it's also complex gameplay. I don't have that working; I can't show that off. I'd love to talk about it, but that's a future hook. I'm not sure how to categorize that.

OK, so that's my Top 3 Keys to Success. I think I'm currently failing at #1 -- I need more graphics and a video for my project. I will definitely have those before I launch.

Saturday, April 11, 2015

Sloppy Code and Procedural Forest Generation

Screenshot showing different tree shapes
It's interesting as I add more bits and pieces to my terrain generator that I realize that "I'm doing things wrong."

Many times the best way to understand how to solve a coding challenge is to sit down and write the code. By the time you get the code (mostly) working, you'll have identified the important parts of the problem and some of the considerations you have to make in the code.

Take trees, for instance. Recently I added a bunch of new tree types to my terrain engine. How do add trees? For a lot of terrain generation, I just start with "walk through every cell and decide if there's a tree there." Forest? Greater chance that there's a tree. Desert? Unlikely that there'll be a tree, and if there is, it'll be a cactus or maybe a Joshua tree. Sure. OK. How big is the tree? For a sparse area (like plains or desert, or even a mountain that isn't forest-covered), once you decide to place a tree, you're pretty much free to choose any tree size you want without having to worry about butting against other terrain.

But what about forests? The naïve algorithm (gimme the next square; ok, what size tree will fit here?) produces a forest of tiny trees ... because the tile to the north and the west are both filled. (This is assuming a walk of the for (y=0..n) for (x=0..n) sort.) Tiny trees? Well that's a poor forest. My first assumption was that I would try to center a tree on x, y. The next choice is to put the top-left right there. This results in a forest of giant trees, because (generally) the space to the south and east is empty because the algo hasn't walked there yet. But I can't choose the type of tree first and then choose where to put it, because I don't want to put a forest-type tree in a non-forest biome. (Each tile has its own biome, and borders are irregular -- which is why I started with putting the trunk of a tree at x,y -- because I knew the biome for x,y.)

OK, so maybe I pick a size first, and then pick a tree type. This kinda works, because generally if I'm at x,y and that's the northwest corner of a tree, generally the spot where I want to put the trunk of the tree is very close and of the same biome type. But what if it's not?

What I finally settled on is to first make sure I had a minimal tree size available. This is just 3x3. If that much room isn't available and/or the center of that possible tree is in a different biome, then I decide not to plant a tree and move on. This minimal condition means I have a fallback. Next I try to make as big a tree as possible. If a 5x5 is possible, I think check 7x7. This goes up until I reach my max tree size (which right now is 7x7, just because I don't want to fuss with larger trees yet; and also I haven't yet looked at asymmetric trees OR trees with 2x2 trunks). So now I have a set of possible sizes: (3x3, 5x5, 7x7), as well as a maximum height that the space allows. THEN I decide what type of tree, how wide to make it, and how tall.

Given those parameters, it's still possible to make the same type of tree (eg an oak) in different ways. Sometimes the trunk is taller; sometimes the leaf canopy is shaped differently. But, having written the code, it became clear that if I said "this tree MUST be 5x5 and it MUST be 9 voxels high and it MUST be an oak", that it's fairly straightforward to define the algorithm for making an oak that big.

At first the code was sloppy, but it got better. Gradually. I added the assistance functions as I went (is there room for a 3x3 here? is there a function for saying "all these voxels should be leaves"?). I separated size-checking from tree-size-choice. In this case, I really wound up inverting the algorithm -- instead of randomly choosing a tree type and size first, and then checking to see if it fits, I see how much room I have, and then choose a size (and type) based on that.

The key is to be willing to rewrite code. My end goal wasn't just to have more trees in the world; it was to have a well-built, robust, and extensible system. This means the code isn't fragile; small changes won't crash the whole thing. The code used to plant trees on top of other trees; it doesn't do that any more. Robustness means that all the trees it generates are properly formed and in the right places. Finally, it's easy to add more trees ... which is good, because I've got plans for 15 different tree types!

I started by writing sloppy code. To me, quick and dirty is ok, because it leads the programmer to solve the most important problem first: understanding the solution.